Students can learn to create a series of instructions to solve various problems by constructing algorithms without a computer. By using basic programming principles such as commands, symbols, loops, variables, functions, sequences and code, they can create their own programs. First, initiate the use or creation of tactile flowcharts by the braille reader, and subsequently transition them to using pseudocode in textual form. Select outputs where senses other than vision are used. This can be achieved through sound reproduction or movement as for example in the code of a dance with specific movements.
Exercises
Exercise 1: Programming With Boomwhackers
A Boomwhacker is a percussion instrument consisting of lightweight, hollow plastic tubes that are color-coded and tuned to different musical pitches based on the length.
Create a melody by striking the different tubes in the correct order. Write the code for the melody using one or two of the first letters of the tube’s color or number. Work in pairs. Make a code for a melody that another pair will then try to play.
Preparations: Mark each tube tactilely with a number, symbol or with the first letter of the color. Place the tubes in order of size.
Exercise 2: Program Each Other
Program your friend so that the friend can reach a certain destination at school. You can also create a maze, for example by drawing a grid on the floor, where the goal is to find the fastest way from the start to a given point.
Plan the instructions using arrows, symbols, or commands such as “A = Forward, B = Backward, C = Left, D = Right, Move three squares forward, Move two squares backward”, etc. Use concepts such as algorithms and loops. When using loops (“repeat X times”), try to find the least number of instructions that lead to the goal.
Create a tactile flowchart with ready-made tactile symbols. You can also write the instructions on the computer or use code bricks. Once the program is complete, pass it on to your friend, who will try to follow the instructions during the trip around school or through the maze.
The teacher may also have created ready-made codes for various routes in the school and printed them in braille.
A small booklet with step-by-step instructions written in braille
Exercise 3: Program a Dance
Materials: Braille code bricks and visual text code bricks, along with a board for arranging the code bricks. Select text on bricks such as jump, clap, left, right, forward, backward, while, if, until. Create more bricks, for example instructions to turn a certain number of degrees (turn 90 degrees, 180 degrees, etc.), step length or oral expressions.
Creating a dance routine is very similar to creating an algorithm for a computer. We plan what to do, when to do it, at what speed, and how many times to repeat it.
How should the dance step look? Should we use both legs and arms simultaneously? Should we turn around? How many degrees for each step? Should we do the same thing several times in a row (loop)?
Let the students work together in pairs and let them create the code with code bricks or in a text document. Each group can try the dance code on other students.
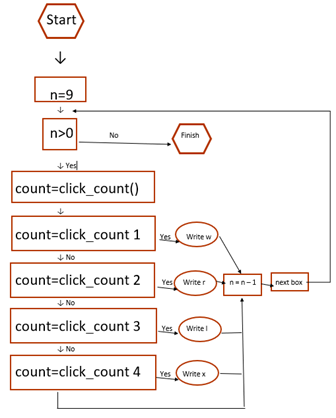
Exercise 4: Communication by Pen Click Sound
Use a table (3×3) in Word or Excel and four different letters: l, r, w, x.
The teacher creates 12 pre-made task images.
l
x
l
x
x
x
l
x
l
r
l
w
l
x
l
r
l
w
x
l
x
l
x
l
x
l
x
You can think of each small shape as a pixel in a larger image consisting of 9 small squares.
As a group, you must select a receiver and a sender among you. The sender sits back-to-back with the receiver and then selects a task image. The sender sends the data on the task sheet to the receiver using only the pen click sound. Accordingly, the receiver will write down the received letters in a blank 3×3 table.
The group should make a strategy as a group on how to send the data to the receiver and write down the strategy. They have 10-15 minutes for this task.
Each pen click they make to transfer data during the task will count as a point (+1). When it is done, the similarity between the image that created the image and the task image that was given to the group is checked. Each cell that is different in the task image cells and created image cells will add +10 points to the score. The group that completes the task with the lowest score will be considered to have developed the best strategy.
The groups explain their communication strategies to the other groups. Afterwards, the roles can be switched, and the exercise can be done again with a new randomly selected task image.
Proposal for a flowchart: Example of a flowchart
Manage your consent
To give you the best experience, we use technologies like cookies to store and/or access device information. Consenting to these allows us to process data such as browsing behavior or unique IDs. Not consenting or withdrawing consent may affect certain features and functions.
Functional
Always active
Storage or access is necessary to use a specific service requested by the user or for electronic communication.
Preferanser
Lagring av data eller tilgang er nødvendig for å lagre preferanser som ikke er etterspurt av abonnenten eller brukeren.
Statistics
Storage or access is used only for statistical purposes.Lagring av data eller tilgang brukes utelukkende til anonyme statistiske formål. Uten en stevning, frivillig samtykke fra din internettleverandør eller en tredjepart, kan informasjon som er lagret eller hentet for dette formålet alene vanligvis ikke brukes til å identifisere deg.
Marketing
Storage or access is needed to create user profiles to send ads or track the user across websites for similar marketing purposes.