Jump to:
Introduction to the Coordinate System
Understanding the Coordinate System – a Stepwise Guide
Introducing a Coordinate System With Adjustable Axes
We recommend that the braille reader is well acquainted with the coordinate system before graphs are introduced.
For a sighted person, an image of a graph in a coordinate system will have a kind of a 3D appearance. The coordinate system will appear as a background for the graph. This appearance makes it easy to separate the graph from the coordinate system. For the braille reader, this is very different. Tactile reading will never provide a 3D appearance. Instead, different lines and structures are felt. To help the braille reader distinguish the graph from the coordinate system more effectively, it is recommended that specialized training be provided to systematically build an understanding of the tactile coordinate system. Being well acquainted with the different parts of the coordinate system and knowing where to find them in the image will make it easier to recognize them in a composite tactile graph.
Introduction to the Coordinate System
A good start may be to present the braille reader with simple coordinate systems made in different ways, for example folded paper or with Wikki Stix.
Explain that the two lines represent axes and are perpendicular. Make sure the braille reader understands the concept of perpendicular. Also use the words horizontal and vertical and make sure that the braille reader understands this.
Count the four rooms created by the axes and introduce the word quadrants.
Ask the student to create their own coordinate system using Wikki Stix to check their understanding of the various concepts.
Also make sure that the student understands the concept of parallel lines. Use folded paper, tactile drawings, Wikki Stix or similar and let the student explore that the space between the lines is constant.
Understanding the Coordinate System – a Stepwise Guide
Here we present a step-by-step guide to teach the braille reader about the coordinate system. We will work with a coordinate system with four quadrants. For this training, we have experienced that it is an advantage to have prepared a series of coordinate systems to be used in the different steps. Make the drawings so that the next step is similar to the previous one, but with the new part added.
For example:
| Step 1: | Step 2: | Step 3: | Step 4: |
 |  |  |  |
Please note that these illustrations are just examples. We recommend that you make drawings that match the coordinate system the braille reader will meet in their adapted textbooks.
The five steps for introducing the coordinate system are:
Step 1: Ensure a Basic Understanding of Coordinate Systems, Axes, Origin and Quadrants
Step 2: Introduce Steps Along the Axes
Step 3: Introduce Gridlines
Step 4: Practice Reading the Numbers Along the Axes Step 5: Introduce Coordinates
1: Ensure a Basic Understanding of Coordinate Systems, Axes, Origin and Quadrants
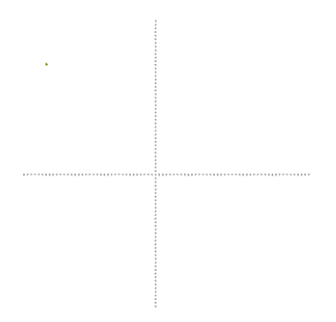
In the beginning, the braille reader needs to understand the concept of the coordinate system. Use a simple coordinate system that only shows the axes.
- x-axis and y-axis:
Explain that the student will now explore a tactile drawing of a coordinate system with an x-axis and y-axis. Explain that the two axes are perpendicular to each other. The x-axis is the horizontal line, and the y-axis is the vertical line. Make sure the student uses both palms and explores the entire sheet, and the fingertips to explore the axes in more detail.
Exercise: Ask the student to find the x-axis, the y-axis and the point where the axes cross.
- Origin
Explain that the point where the axes cross is called the origin. If the braille reader finds it difficult to locate the origin, you can put a pin in the point to reinforce it. - Quadrants
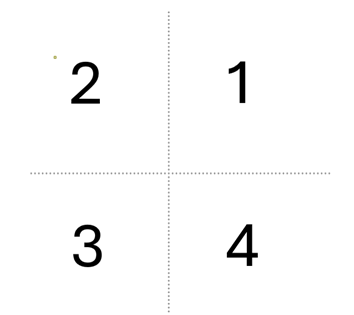
Explain that the axes create four rooms that are called quadrants. Explain the numbering of the four quadrants. If the braille reader has problems understanding above and below the axis, the coordinate system can be oriented vertically. Being able to name all quadrants helps the braille reader to build a mental structure of the coordinate system. Furthermore, knowing these terms enables the braille reader to communicate about the coordinate system with others during the math lesson.
Exercise:
Let the student investigate the four quadrants with their hands. Then let the braille reader point with a finger in each of the quadrants while giving the name of that quadrant.
2: Introduce Steps Along the Axes
Explain that the axes are number-lines and how the values change from negative to positive. Let the braille reader investigate a coordinate system where the steps are marked along the axes.
Exercise:
Ask the braille reader to locate the origin with one index finger. From the origin, ask them to follow the x-axis to the right, with the index finger, and count the number of steps along the way.
Repeat for the y-axis.
3: Introduce Gridlines
Inform the braille reader that a new coordinate system will be provided, consisting of an x-axis, a y-axis, and four quadrants. In this coordinate system, gridlines are drawn parallel to the x-axis and y-axis. Those that run parallel to the x-axis are referred to as horizontal gridlines. Those parallel to the y-axis are vertical gridlines.
Make sure the braille reader uses both palms and explores the entire drawing.
- Ask the student to find the x-axis and y-axis and to describe the tactile difference between these and the gridlines. If the braille reader is unable to describe the difference between the lines – help them find terms to describe the different lines. Use terms such as solid and dotted line. Feel free to reinforce the x- and y-axis with Wikki Stix if there are difficulties to distinguish the lines.
- Ask the student to count 2 steps on the x-axis and place an index finger at this point. Using the other index finger, follow the gridline upwards to the top of the drawing. Next, follow the gridline downward until both index fingers meet. If the fingers do not meet, repeat the process until it is possible to follow the gridline correctly.
The braille reader needs to move their index finger at a certain speed to maintain alignment with the correct gridline. Moving too slowly may result in losing track, especially in drawings where the gridlines are not solid. If there are problems to follow the gridline, the drawing must be changed, or the gridline reinforced with Wikki Stix so that the braille reader is able to follow the gridline.
4: Practice Reading the Numbers Along the Axes
Explain to the braille reader that a coordinate system is provided, consisting of four quadrants with numbered axes. Note that in this example, the numbering for the y-axis is at the left side of the coordinate system and the numbering for the x-axis is below the coordinate system.
The braille reader must first use both palms to examine the entire figure, then read the numbers with an index finger. Explain the numbering on the axes. Also explain that y = 0 for all points on the x-axis and x = 0 for all points on the y-axis.
Exercise:
Ask the braille reader to count 2 steps on the x-axis. Next, using one index finger, the braille reader should follow the gridline upwards to the top of the drawing. Then, the gridline is followed down to the x-axis and further below it, reaching the numbers at the bottom of the drawing.
5: Introduce Coordinates
The braille reader must learn how to find the coordinates of a certain point, and how to mark a certain point given the coordinates.
- Find the coordinates of a certain point
To read the coordinates of a point, the student must follow the gridline from the point to both axes.
Exercise: Find the coordinates of a certain point
Mark a point in the first quadrant with a pin. Ask the braille reader to find the pin and use an index finger to follow the gridline from the point to the x-axis (and further down to the numbers) and read off the x-value. Then the braille reader moves the index finger back to the pin and follows the gridline to the y-axis (and further to the left to the numbers) to read of the y-value.
- Create a point with certain coordinates
If you use a tactile coordinate system, it should be attached to a soft board with pins. To mark the point (3; 5): First locate 3 on the x-axis. Then follow the gridline parallel to the y-axis and count 5 steps. Put a pin at this point (3; 5).
Exercise:
Let the braille reader mark the point (3; -2).
Reading or marking points that are not on gridlines can be a challenge. The braille reader cannot perform this task with high precision but must develop a sense of how it works. They need to estimate where the point is located. To mark a point, the pin can be placed between two gridlines. High accuracy is not possible and should not be expected from the braille reader.
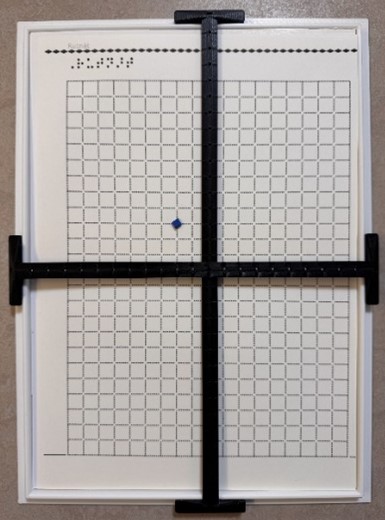
Introducing a Coordinate System With Adjustable Axes
The adjustable coordinate system consists of a board and two axes that are 3D-printed. For those with a large enough 3D printer, we recommend printing the system in A4 size. It can then be used together with tactile drawings in A4-format.
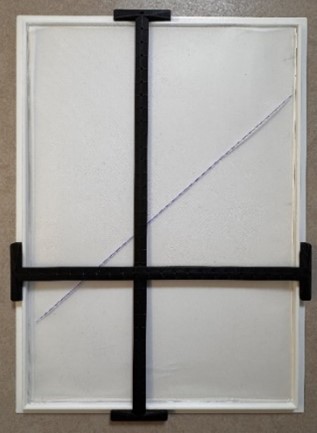
The idea behind the system is to offer the braille reader a way to work dynamically with the coordinate system and graphs. In the instructional guide for math teachers you will find ideas and examples on how to use this device.
Before using the system, braille readers need to learn how to operate it. One should be well acquainted with the tactile coordinate system before being introduced to the system with the adjustable axes.
Get To Know the Adjustable Axes
Start by explaining that this is a 3D-printed coordinate system. Allow time to investigate the board and the axes separately. Mention that the axes represent number lines, and encourage examining the markings along them to count the steps.
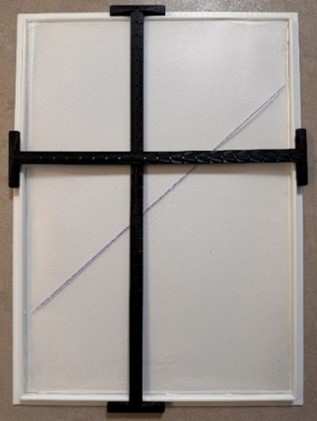
Once familiar with the various parts, the axes can be mounted on the board. Explain that the axes represent the x- and y-axis in a coordinate system, where it is adjustable. Practice moving the x-axis up and down and the y-axis in the left-right direction.
Ask the braille reader to move the axes so that
- the coordinate system has only one quadrant
- the coordinate system has two quadrants
- the coordinate system has four quadrants
Learn About the Quadrants
Fix the axes for example by putting a needle in the point where the axes cross. Tell the braille reader that this is the origin.
- Ask the braille reader to count units along the axis in both positive and negative direction.
- Let the braille reader investigate the x- and y-values in the four different quadrants. Examine where the values are positive, negative and one of each.
- Place a tactile drawing of one dot on the board below the axes.
- Ask the braille reader to locate the point and decide which quadrant it is in.
- Ask the braille reader to move the axis so that the point will be in the different quadrants.
Coordinates
Place a tactile drawing of a point and gridlines (make sure there are no axes on the drawing) on the board below the adjustable axes.
- Read the coordinate
- Ask the braille reader to locate the point and decide which quadrant.
- Also ask them to decide if the x- and y-values are positive or negative in that quadrant.
- Tell the braille reader to, with one index finger, follow the gridline from the point and in a vertical direction towards the x-axis. Ask them to keep their index finger at the point at the axis. With the other index finger, count the steps from the origin to the point. Repeat for the y-axis.
- Decide the coordinate
Ask the braille reader to move the axis so that the point gets certain coordinates, for example:
(3; 4)
(-2; 3)
(-3; -2)
(4; -3)
Let the braille reader reflect on how to move the axes to change the coordinates in a positive and negative direction.